Obelisks: The key to a Stormwail victory!
Posted: July 9th, 2007, 3:15 pm
Introduction:
You are thrown into the havoc of battle, high a top Stormwail Peak. Other players are setting their zoom level, calling lanes, discussing tactics. You see you have started with a scroll. A quick read shows that items in this game can be upgraded. You upgrade your scroll at your altar. A Mini-Obelisk Control Tower? What use is that? You see it can be sold for 500gp. But before you make it to the next store you hear someone yell at you about typing "-o." A mass of pings show up on the map. You head for the nearest one, nestled on a cliff. You place your tower right next to it. The fight for control has begun.
Breakdown:
There are a total of 10(ten) Obelisk towers to be had on the map. Each requires 1(one) Obelisk Control Tower placed next to it to capture it. Every hero has the capability to start off with 1(one) Mini-Tower which the hero can carry and place at their leisure. Alternately, you may make more towers by getting a Worker for 100(one hundred) gold at any Hall/Tree/Necropolis to build one for 500(five hundred) gold. Keep in mind that getting a builder out to locations under fire is dangerous, the worker must survive to finish construction, and they cost 100(one hundred) gold to buy.
Purpose:
Obelisks are the most pivotal part of the Stormwail Peak map. If you do not understand them you will find yourself easily overwhelmed by better units, better heroes, and all sorts of offensive weapons you didn't know existed. Here is what capturing an Obelisk means for you.
Energy: Every Obelisk you control will give you 5(five) energy. This is tallied where the Supply is shown in regular ladder games. Spending the energy requires a Worker. Build a Generator. Once built it does nothing, but for certain amounts of Energy it can be upgraded to a variety of functions. Also, any unused Energy will give your hero 1% extra experience gain, meaning each Obelisk gives you 5% more.
Tower Cores: Tower Cores are used to build Spawn Towers. These buildings, when built at any Hall/Tree/Necropolis will automatically generate one unit per wave with the regular spawn units, depending on which tower you built. This will give each wave a huge advantage, and is often the key to victory.
The Artifact: Besides destroying the opposing teams Main base, you can also win by capturing the Artifact. When a team controls MORE obelisks than the other team, they gain more Control of the Artifact. This is shown in the Team Status drop down window at the top right of the screen in a percentage. If one team gets to 100% Control, the Artifact will appear in the middle of the map, right atop Stormwail Peak. The Artifact can then be captured by an Arcane Wagon, bought at any third tier Hall/Tree/Necropolis. (Your main base is the only third tier that you start out with.) Once the Wagon makes it safely to the Artifact, it must return it to the capturing team's main base. WARNING! The Wagon will have severely reduced movement speed and should be protected at all costs. Although only the team with 100% control can CAPTURE the Artifact, if the other team manages to kill your Wagon, they may then get their OWN Wagon to capture it and try to return it to their base. If either team gets the Artifact to their Main base, the game is over.
Layout:
For the purposes of this guide, the lanes of Stormwail will be given names.
From top to bottom: North, Rock, Middle, Inn, South.
Obelisks are set up in 5(five) unique positions that are mirrored for each side. They are split into two groups: Contestable(C) and Safe(S).
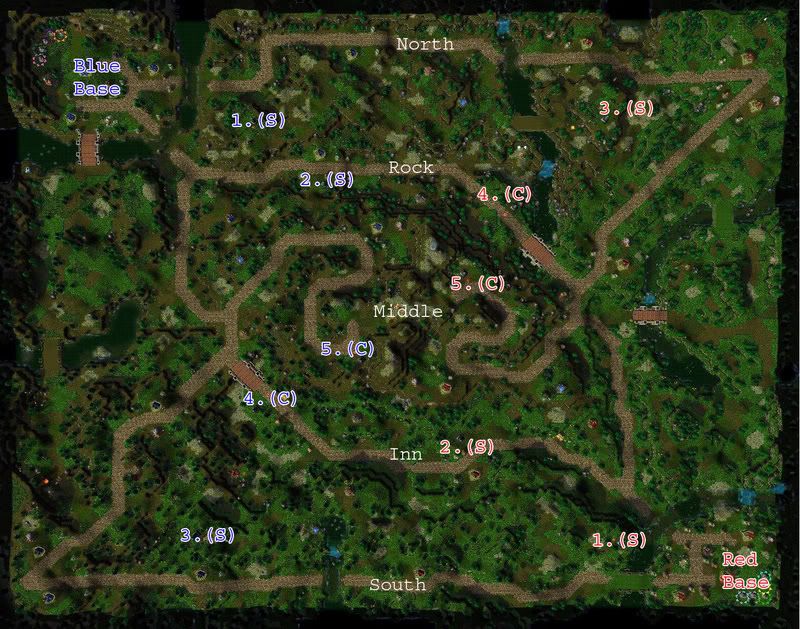
Red Team:
1.On a cliff just past the bridge coming out of the base on South lane.(S)
2. At the towers of the Inn lane base. Though it is the line of fire, the defensive capabilities of the base mark it Safe.(S)
3. On a cliff just below the forefront base on North lane.(S)
4. Just past the bridge in front of the forefront Rock lane base; up the hill. Though much closer to the Red team's Rock lane base, there is still a lot of exposure to the spawn units of each team.(C)
5. At the first left bend going up the mountain from the base in Middle, near the shortcut by the Goblin shop on Rock lane.(C)
Blue Team:
1. In the hills near the main base between Rock lane and North lane. (S)
2. Near the defensive towers of the Rock base. Though it is the line of fire, the defensive capabilities of the base mark it Safe.(S)
3. On a cliff directly above the forefront South base.(S)
4. Directly infront of the bridge on Inn lane. Though much closer to the Blue team's Inn base, it is still suseptable to a regular flow of units.(C)
5. By the first left turn going up the mountain the Middle base, just ahead of the shortcut by the Goblin shop on Inn lane.(C)
Priorities:
As you can see, the safe obelisks should be taken as soon as possible because the other team will almost definitely have theirs up right off the bat. You don't want to give them an advantage they didn't even have to fight for. This means most games will revolve around fighting over the remaining 4(four.)
The Inn and Rock lane Obelisks are the easiest Contestable Obelisks to obtain fast, as they are close to three key elements: Bridges, Goblin Merchants, and Bases. If you can get one early in the game and hold it, you will most likely have an advantage.
Bridges may seem to just look pretty, but they concentrate forces, allowing anyone with an AoE spell to hit maximum targets. This is more of an advantage to you if you are not the team with the closest base because the bridge is situated that if you have it, then they are trying to fight their way across the bridge. If you are the team closest to the Obelisk and you are fighting on the bridge, it means there is a fight going on between you and your Obelisk.
The Goblin Merchants are a great source of offensive and defensive items. There are three main items that can be used to defend or attack an Obelisk. The Frozen Skull (200gp) allows any player to cast Blizzard for a set amount of time. This is very useful when fighting on the aforementioned bridges. The Bottle of Ooze(340gp) creates a slime monster that, although rather powerful by itself, when it's killed, splits into two smaller monsters, which, when killed split into two more smaller monsters, ect. The Wretched Skull (290gp) creates a small army of skeleton warriors and archers which can bolster and attack force, surround enemy heroes, or be focused on taking down the Obelisk.
Being near to a base means that your spawns will reach them faster than the enemy spawns, meaning you can defend it easier. Also, if you upgrade your Hall/Tree/Necropolis to tier 2(two) or tier 3(three), you can use it to heal faster, allowing you to get out there and fight faster.
Also, if you manage to break through the opposing base on the Inn or Rock lane, you will have access to one of the other teams Safe Obelisks. This is a huge blow because they must then take a Contested Obelisk to remain at their basic 3(three) Obelisks, as well as take another to get even amounts of Control.
The Middle lane Obelisks are the hardest to hold, but give the most advantage, since there are 2(two) in the same lane. If you can manage to hold onto 1(one), you might be able to hold on to 2(two), as any reinforcements will help both.
Tips:
Each side has heroes that can move around the map relatively unseen. Use them to sneak behind enemy lines to take out the Safe Obelisks. Be careful! Even the obscure Obelisks have units guarding them to prevent the fastest hero taking a quick lead.
Taking away the Safe Obelisks is a huge blow to any team. Most players will forget about them, so if you can manage to take on for your own, they must then get a Contested Obelisk just to remain even.
Concentrate your forces on the lanes that contain Obelisks. Even though you may destroy the opposing base on the North or South, if they get a foot hold on your Inn, Rock, or even your Middle bases, it is not worth it and you will have an uphill climb ahead of you.
Selling your Mini Obelisk Control Tower gives you 500(five hundred) gold, the same cost to build one yourself; minus the builder. Getting to a Safe Obelisk requires your hero to be out of combat, lessening the amount of experience you can gain. Selling your Mini Obelisk Control Tower at the start, buying a builder, and obtaining one of the safer Obelisks, can be a prudent way to soak up as much experience as you can, as fast as you can.
Hold on to your Tiny Obelisk Control Tower for the Contested Obelisks. Your Worker can easily get to and build at a Safe Obelisk, but it runs the risk of dying in the field of battle. A Tiny Obelisk Control Tower is self building, eliminating that risk. But you only get one!
Summary:
They key to Obelisks is simple. You want to have more than the other team for as much of the game as possible. As long as you have your three Safe Obelisks, which ones you get after that is up to your team and how you want to play. Use the information above to make that decision, weighing placement, defendability, and necessity.
You are thrown into the havoc of battle, high a top Stormwail Peak. Other players are setting their zoom level, calling lanes, discussing tactics. You see you have started with a scroll. A quick read shows that items in this game can be upgraded. You upgrade your scroll at your altar. A Mini-Obelisk Control Tower? What use is that? You see it can be sold for 500gp. But before you make it to the next store you hear someone yell at you about typing "-o." A mass of pings show up on the map. You head for the nearest one, nestled on a cliff. You place your tower right next to it. The fight for control has begun.
Breakdown:
There are a total of 10(ten) Obelisk towers to be had on the map. Each requires 1(one) Obelisk Control Tower placed next to it to capture it. Every hero has the capability to start off with 1(one) Mini-Tower which the hero can carry and place at their leisure. Alternately, you may make more towers by getting a Worker for 100(one hundred) gold at any Hall/Tree/Necropolis to build one for 500(five hundred) gold. Keep in mind that getting a builder out to locations under fire is dangerous, the worker must survive to finish construction, and they cost 100(one hundred) gold to buy.
Purpose:
Obelisks are the most pivotal part of the Stormwail Peak map. If you do not understand them you will find yourself easily overwhelmed by better units, better heroes, and all sorts of offensive weapons you didn't know existed. Here is what capturing an Obelisk means for you.
Energy: Every Obelisk you control will give you 5(five) energy. This is tallied where the Supply is shown in regular ladder games. Spending the energy requires a Worker. Build a Generator. Once built it does nothing, but for certain amounts of Energy it can be upgraded to a variety of functions. Also, any unused Energy will give your hero 1% extra experience gain, meaning each Obelisk gives you 5% more.
Tower Cores: Tower Cores are used to build Spawn Towers. These buildings, when built at any Hall/Tree/Necropolis will automatically generate one unit per wave with the regular spawn units, depending on which tower you built. This will give each wave a huge advantage, and is often the key to victory.
The Artifact: Besides destroying the opposing teams Main base, you can also win by capturing the Artifact. When a team controls MORE obelisks than the other team, they gain more Control of the Artifact. This is shown in the Team Status drop down window at the top right of the screen in a percentage. If one team gets to 100% Control, the Artifact will appear in the middle of the map, right atop Stormwail Peak. The Artifact can then be captured by an Arcane Wagon, bought at any third tier Hall/Tree/Necropolis. (Your main base is the only third tier that you start out with.) Once the Wagon makes it safely to the Artifact, it must return it to the capturing team's main base. WARNING! The Wagon will have severely reduced movement speed and should be protected at all costs. Although only the team with 100% control can CAPTURE the Artifact, if the other team manages to kill your Wagon, they may then get their OWN Wagon to capture it and try to return it to their base. If either team gets the Artifact to their Main base, the game is over.
Layout:
For the purposes of this guide, the lanes of Stormwail will be given names.
From top to bottom: North, Rock, Middle, Inn, South.
Obelisks are set up in 5(five) unique positions that are mirrored for each side. They are split into two groups: Contestable(C) and Safe(S).
Red Team:
1.On a cliff just past the bridge coming out of the base on South lane.(S)
2. At the towers of the Inn lane base. Though it is the line of fire, the defensive capabilities of the base mark it Safe.(S)
3. On a cliff just below the forefront base on North lane.(S)
4. Just past the bridge in front of the forefront Rock lane base; up the hill. Though much closer to the Red team's Rock lane base, there is still a lot of exposure to the spawn units of each team.(C)
5. At the first left bend going up the mountain from the base in Middle, near the shortcut by the Goblin shop on Rock lane.(C)
Blue Team:
1. In the hills near the main base between Rock lane and North lane. (S)
2. Near the defensive towers of the Rock base. Though it is the line of fire, the defensive capabilities of the base mark it Safe.(S)
3. On a cliff directly above the forefront South base.(S)
4. Directly infront of the bridge on Inn lane. Though much closer to the Blue team's Inn base, it is still suseptable to a regular flow of units.(C)
5. By the first left turn going up the mountain the Middle base, just ahead of the shortcut by the Goblin shop on Inn lane.(C)
Priorities:
As you can see, the safe obelisks should be taken as soon as possible because the other team will almost definitely have theirs up right off the bat. You don't want to give them an advantage they didn't even have to fight for. This means most games will revolve around fighting over the remaining 4(four.)
The Inn and Rock lane Obelisks are the easiest Contestable Obelisks to obtain fast, as they are close to three key elements: Bridges, Goblin Merchants, and Bases. If you can get one early in the game and hold it, you will most likely have an advantage.
Bridges may seem to just look pretty, but they concentrate forces, allowing anyone with an AoE spell to hit maximum targets. This is more of an advantage to you if you are not the team with the closest base because the bridge is situated that if you have it, then they are trying to fight their way across the bridge. If you are the team closest to the Obelisk and you are fighting on the bridge, it means there is a fight going on between you and your Obelisk.
The Goblin Merchants are a great source of offensive and defensive items. There are three main items that can be used to defend or attack an Obelisk. The Frozen Skull (200gp) allows any player to cast Blizzard for a set amount of time. This is very useful when fighting on the aforementioned bridges. The Bottle of Ooze(340gp) creates a slime monster that, although rather powerful by itself, when it's killed, splits into two smaller monsters, which, when killed split into two more smaller monsters, ect. The Wretched Skull (290gp) creates a small army of skeleton warriors and archers which can bolster and attack force, surround enemy heroes, or be focused on taking down the Obelisk.
Being near to a base means that your spawns will reach them faster than the enemy spawns, meaning you can defend it easier. Also, if you upgrade your Hall/Tree/Necropolis to tier 2(two) or tier 3(three), you can use it to heal faster, allowing you to get out there and fight faster.
Also, if you manage to break through the opposing base on the Inn or Rock lane, you will have access to one of the other teams Safe Obelisks. This is a huge blow because they must then take a Contested Obelisk to remain at their basic 3(three) Obelisks, as well as take another to get even amounts of Control.
The Middle lane Obelisks are the hardest to hold, but give the most advantage, since there are 2(two) in the same lane. If you can manage to hold onto 1(one), you might be able to hold on to 2(two), as any reinforcements will help both.
Tips:
Each side has heroes that can move around the map relatively unseen. Use them to sneak behind enemy lines to take out the Safe Obelisks. Be careful! Even the obscure Obelisks have units guarding them to prevent the fastest hero taking a quick lead.
Taking away the Safe Obelisks is a huge blow to any team. Most players will forget about them, so if you can manage to take on for your own, they must then get a Contested Obelisk just to remain even.
Concentrate your forces on the lanes that contain Obelisks. Even though you may destroy the opposing base on the North or South, if they get a foot hold on your Inn, Rock, or even your Middle bases, it is not worth it and you will have an uphill climb ahead of you.
Selling your Mini Obelisk Control Tower gives you 500(five hundred) gold, the same cost to build one yourself; minus the builder. Getting to a Safe Obelisk requires your hero to be out of combat, lessening the amount of experience you can gain. Selling your Mini Obelisk Control Tower at the start, buying a builder, and obtaining one of the safer Obelisks, can be a prudent way to soak up as much experience as you can, as fast as you can.
Hold on to your Tiny Obelisk Control Tower for the Contested Obelisks. Your Worker can easily get to and build at a Safe Obelisk, but it runs the risk of dying in the field of battle. A Tiny Obelisk Control Tower is self building, eliminating that risk. But you only get one!
Summary:
They key to Obelisks is simple. You want to have more than the other team for as much of the game as possible. As long as you have your three Safe Obelisks, which ones you get after that is up to your team and how you want to play. Use the information above to make that decision, weighing placement, defendability, and necessity.